| Top 10 Most Discordant Cases (Pre-AI) | ||||||
| Cases with highest inter-pathologist variance | ||||||
| case_id | pathologist | er_pre | pr_pre | ki67_pre | her2_pre | comment |
|---|---|---|---|---|---|---|
| 10257-25 | Pathologist 1 | 70.0 | 40.0 | 39.0 | 3 | NA |
| 10257-25 | Pathologist 2 | 70.0 | 70.0 | 50.0 | 3 | NA |
| 10257-25 | Pathologist 3 | 80.0 | 40.0 | 40.0 | 3 | NA |
| 10257-25 | Pathologist 4 | 30.0 | 30.0 | 39.0 | 3 | NA |
| 13471-25 | Pathologist 1 | 95.0 | 10.0 | 3.0 | 0 | NA |
| 13471-25 | Pathologist 2 | 95.0 | 40.0 | 3.0 | 1 | NA |
| 13471-25 | Pathologist 3 | 90.0 | 60.0 | 25.0 | 0 | NA |
| 13472-25 | Pathologist 1 | 70.0 | 50.0 | 24.0 | 1 | NA |
| 13472-25 | Pathologist 3 | 90.0 | 60.0 | 25.0 | 0 | her2 de invaziv alanlari taniyamamis |
| 13472-25 | Pathologist 4 | 95.0 | 90.0 | 14.0 | 1 | NA |
| 23259-25 | Pathologist 2 | 100.0 | 50.0 | 3.0 | 0 | lobuler karsinomu taniyamiyor |
| 23259-25 | Pathologist 3 | 60.0 | 60.0 | 3.0 | 0 | NA |
| 23259-25 | Pathologist 4 | 95.0 | 90.0 | 3.0 | 0 | NA |
| 27247-25 | Pathologist 3 | 80.0 | 60.0 | 8.0 | 0 | NA |
| 27247-25 | Pathologist 4 | 95.0 | 90.0 | 8.0 | 1 | NA |
| 31289-25 | Pathologist 2 | 30.0 | 5.0 | 6.0 | 0 | NA |
| 31289-25 | Pathologist 3 | 60.0 | 40.0 | 1.0 | 0 | NA |
| 33681-25 | Pathologist 1 | 95.0 | 90.0 | 30.0 | 2 | AI-SKOR1 |
| 33681-25 | Pathologist 2 | 50.0 | 30.0 | 35.0 | 1 | artefaktli boyanma |
| 33681-25 | Pathologist 3 | 90.0 | 90.0 | 30.0 | 1 | NA |
| 33681-25 | Pathologist 4 | 95.0 | 95.0 | 35.0 | 2 | 2t3'te her2 ile fokal +2 boyanan yer vardi o yuzden skor 2 diye degerlendirdim. |
| 34334-25 | Pathologist 2 | 90.0 | 0.0 | 23.0 | 1 | artefaktli boyanma AI icin cok sakincali |
| 34334-25 | Pathologist 3 | 90.0 | 80.0 | 22.0 | 1 | her2 insitu skor 3 snmis |
| 34334-25 | Pathologist 4 | 95.0 | 0.0 | 23.0 | 1 | AI PR'DEKI ARTEFAKTLI BOYAMAYI POZITIF KABUL ETMIS. AI HER2 skor 3 vermis yine benzer artefakt var. |
| 9347-25 | Pathologist 1 | 75.0 | 40.0 | 32.0 | 2 | HER2-AI SKOR 1 |
| 9347-25 | Pathologist 2 | 100.0 | 50.0 | 40.0 | 2 | NA |
| 9347-25 | Pathologist 3 | 90.0 | 90.0 | 40.0 | 2 | zemindeki strolam hucreleri negatif ER PR olarak saymis. HER2de inv alanlari secmemis |
| 9347-25 | Pathologist 4 | 95.0 | 60.0 | 41.0 | 2 | ER AI'da %60larda hesapladi. AI CERBB2 negatif +1 degerlendirdi. |
| 9628-25 | Pathologist 1 | 40.0 | 0.0 | 4.0 | 0 | NA |
| 9628-25 | Pathologist 3 | 50.0 | 0.0 | 10.0 | 0 | neoadj alms rezidu tumor taniyamiyor |
| 9628-25 | Pathologist 4 | 95.0 | 0.0 | 0.0 | 0 | tedavi sonra tek hucre seklindeki tumorleri tanimiyor. ki-67 tumor hucre sayisi azligindan dolayi degerlendiremedim. |
7 Discordance Analysis
7.1 Objective
Identify and analyze cases where pathologists disagree most, where AI caused divergence, and understand patterns of disagreement.
Note for Pathologist: This report “zooms in” on the disagreements. We identify specific cases where there was high variability among pathologists (the “Top Discordant Cases”). We also look at whether AI made these disagreements better (resolution) or worse (divergence) and which biomarker (ER, PR, Ki67, HER2) causes the most trouble.
7.2 Setup
7.3 Load Data
7.4 High Variance Cases
Identify cases with highest inter-pathologist disagreement.
Note for Pathologist: The table above lists the 10 cases where pathologists disagreed the most before AI. These are inherently “difficult” cases. Review the actual values: if all four pathologists gave very different ER or Ki67 percentages, it may indicate tumor heterogeneity, staining issues, or differing assessment strategies.
7.5 Cases Where AI Increased Disagreement
Identify problematic cases where AI made pathologists disagree more.
Number of cases where AI increased disagreement: 94 Percentage: 32.1 %| Cases Where AI Increased Disagreement | ||||||||||
| Top 10 cases with largest variance increase | ||||||||||
| case_id | pathologist | er_pre | er_post | pr_pre | pr_post | ki67_pre | ki67_post | her2_pre | her2_post | comment |
|---|---|---|---|---|---|---|---|---|---|---|
| 11567-25 | Pathologist 1 | 0.0 | 0.0 | 0.0 | 0.0 | 15.0 | 42.0 | 0 | 0 | NA |
| 11567-25 | Pathologist 2 | 0.0 | 0.0 | 0.0 | 0.0 | 7.0 | 33.0 | 0 | 0 | igsi tumor |
| 11567-25 | Pathologist 3 | 0.0 | 0.0 | 0.0 | 0.0 | 10.0 | 10.0 | 0 | 0 | NA |
| 11567-25 | Pathologist 4 | 0.0 | 0.0 | 0.0 | 0.0 | 15.0 | 42.0 | 0 | 0 | NA |
| 12545-25 | Pathologist 1 | 95.0 | 96.0 | 2.0 | 8.0 | 8.0 | 51.0 | 0 | 0 | NA |
| 12545-25 | Pathologist 3 | 90.0 | 90.0 | 5.0 | 5.0 | 8.0 | 10.0 | 0 | 0 | NA |
| 12545-25 | Pathologist 4 | 95.0 | 95.0 | 5.0 | 5.0 | 8.0 | 20.0 | 0 | 0 | NA |
| 13412-25 | Pathologist 1 | 90.0 | 94.0 | 95.0 | 85.0 | 4.0 | 28.0 | 0 | 0 | NA |
| 13412-25 | Pathologist 2 | 90.0 | 95.0 | 90.0 | 85.0 | 7.0 | 23.0 | 0 | 0 | NA |
| 13412-25 | Pathologist 3 | 90.0 | 90.0 | 90.0 | 90.0 | 8.0 | 0.0 | 0 | 0 | NA |
| 21208-25 | Pathologist 1 | 95.0 | 95.0 | 0.0 | 0.0 | 1.0 | 1.0 | 3 | 3 | NA |
| 21208-25 | Pathologist 2 | 95.0 | 95.0 | 0.0 | 0.0 | 1.0 | 1.0 | 3 | 3 | NA |
| 21208-25 | Pathologist 3 | 80.0 | 60.0 | 0.0 | 10.0 | 1.0 | 0.0 | 3 | 3 | NA |
| 21208-25 | Pathologist 4 | 95.0 | 95.0 | 0.0 | 0.0 | 1.0 | 1.0 | 3 | 3 | NA |
| 25969-25 | Pathologist 2 | 10.0 | 20.0 | 60.0 | 73.0 | 2.0 | 4.0 | 0 | 0 | NA |
| 25969-25 | Pathologist 3 | 20.0 | 20.0 | 50.0 | 40.0 | 4.0 | 4.0 | 0 | 0 | NA |
| 26410-25 | Pathologist 1 | 0.0 | 0.0 | 0.0 | 0.0 | 27.0 | 23.0 | 0 | 0 | NA |
| 26410-25 | Pathologist 2 | 0.0 | 0.0 | 0.0 | 0.0 | 34.0 | 50.0 | 0 | 0 | NA |
| 26410-25 | Pathologist 3 | 0.0 | 0.0 | 0.0 | 0.0 | 34.0 | 50.0 | 0 | 0 | NA |
| 26410-25 | Pathologist 4 | 0.0 | 0.0 | 0.0 | 0.0 | 34.0 | 50.0 | 0 | 0 | NA |
| 29466-25 | Pathologist 1 | 95.0 | 94.0 | 50.0 | 40.0 | 27.0 | 68.0 | 3 | 3 | NA |
| 29466-25 | Pathologist 3 | 90.0 | 90.0 | 60.0 | 40.0 | 27.0 | 40.0 | 3 | 3 | NA |
| 29466-25 | Pathologist 4 | 95.0 | 95.0 | 50.0 | 40.0 | 27.0 | 38.0 | 3 | 3 | NA |
| 30707-25 | Pathologist 2 | 80.0 | 80.0 | 10.0 | 10.0 | 20.0 | 20.0 | 1 | 1 | NA |
| 30707-25 | Pathologist 3 | 90.0 | 50.0 | 30.0 | 20.0 | 5.0 | 10.0 | 1 | 1 | NA |
| 32224-25 | Pathologist 1 | 95.0 | 82.0 | 95.0 | 94.0 | 9.0 | 10.0 | 0 | 0 | NA |
| 32224-25 | Pathologist 2 | 100.0 | 95.0 | 100.0 | 95.0 | 10.0 | 10.0 | 0 | 0 | NA |
| 32224-25 | Pathologist 3 | 90.0 | 90.0 | 90.0 | 60.0 | 9.0 | 12.0 | 0 | 0 | NA |
| 32224-25 | Pathologist 4 | 95.0 | 95.0 | 90.0 | 90.0 | 9.0 | 10.0 | 0 | 0 | NA |
| 7007-25 | Pathologist 1 | 90.0 | 61.0 | 0.0 | 2.0 | 1.0 | 3.0 | 1 | 1 | NA |
| 7007-25 | Pathologist 2 | 90.0 | 90.0 | 0.0 | 0.0 | 0.0 | 0.0 | 1 | 1 | daginik tumor |
| 7007-25 | Pathologist 3 | 80.0 | 60.0 | 0.0 | 1.0 | 1.0 | 3.0 | 2 | 2 | NA |
| 7007-25 | Pathologist 4 | 80.0 | 70.0 | 0.0 | 0.0 | 1.0 | 1.0 | 1 | 1 | NA |
7.6 Cases Where AI Improved Agreement
Identify cases where AI successfully reduced disagreement.
Number of cases where AI decreased disagreement: 193 Percentage: 65.9 %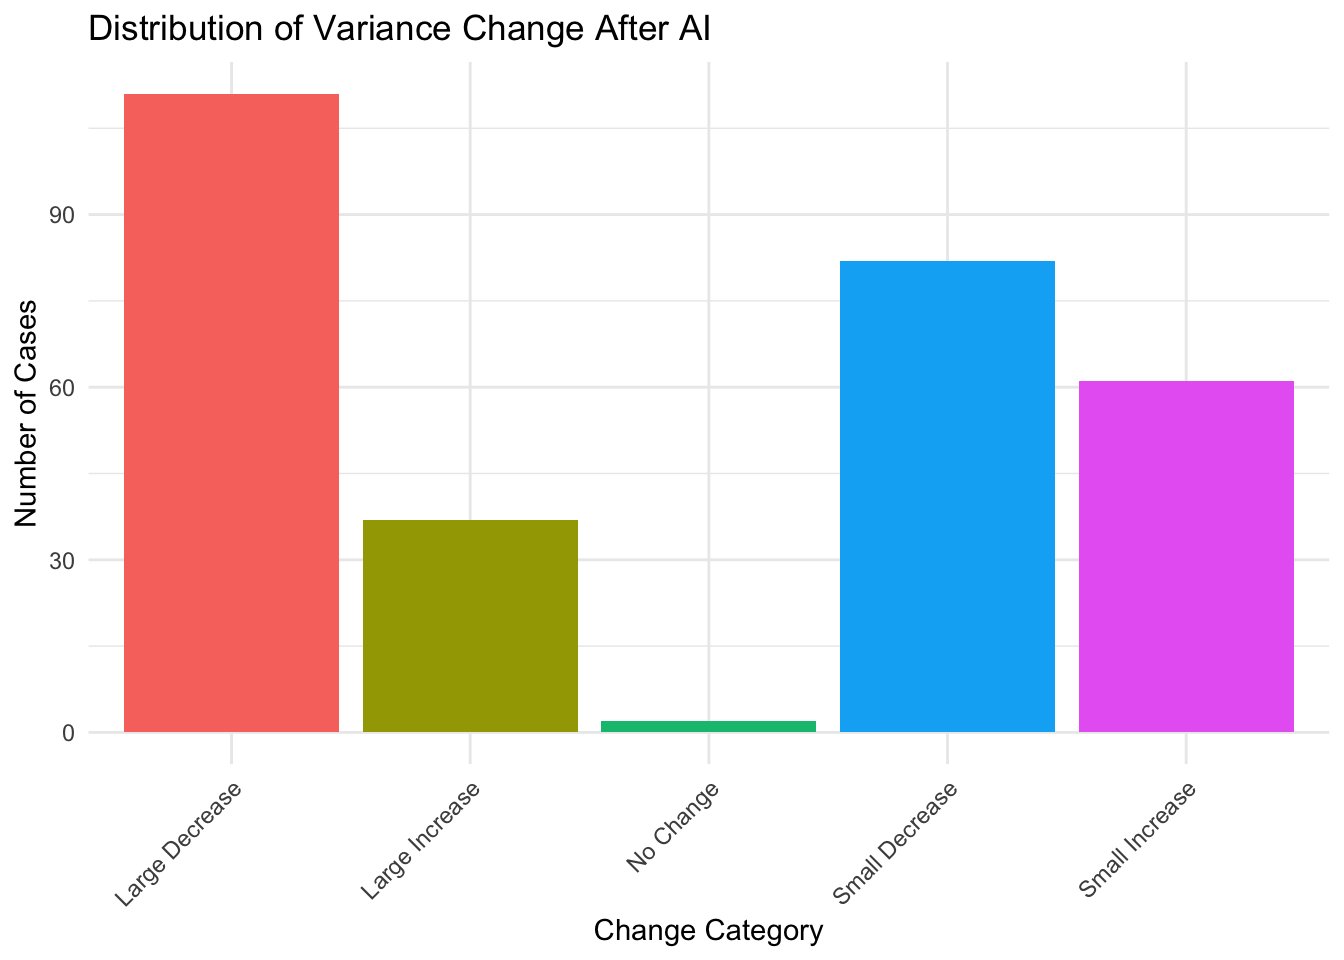
Note for Pathologist: The bar chart above categorizes cases by how much AI changed the spread of pathologist opinions. “Large Decrease” means AI helped the group converge significantly. “Large Increase” means AI made them disagree more. Ideally, most cases should be in the “Decrease” or “No Change” categories.
7.7 Marker-Specific Discordance Patterns
Which markers have the most disagreement?
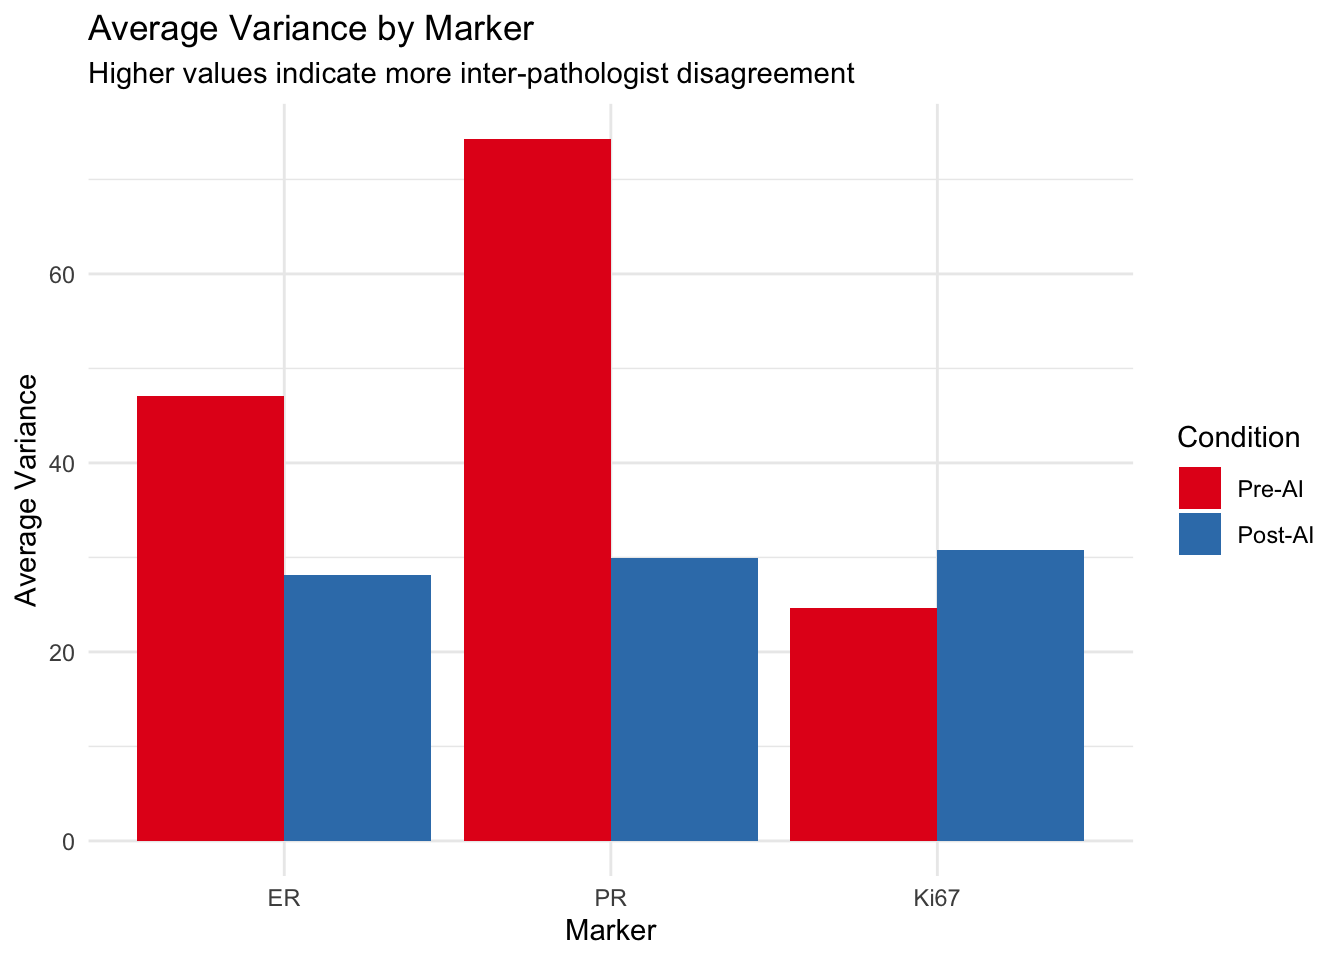
| Variance Change by Marker | ||||
| Marker | Pre-AI Variance | Post-AI Variance | Absolute Change | % Change |
|---|---|---|---|---|
| ER | 47.12 | 28.10 | −19.02 | −40.4 |
| PR | 74.31 | 29.99 | −44.32 | −59.6 |
| Ki67 | 24.66 | 30.78 | 6.12 | 24.8 |
Note for Pathologist: The bar chart and table above break down which markers drive the most disagreement. Higher variance means pathologists gave more different values for that marker. Compare Pre-AI vs Post-AI bars: if the Post-AI bar is shorter, AI helped reduce disagreement for that marker.
7.8 HER2 Disagreement Analysis
Detailed analysis of HER2 scoring discordance.
Number of cases with HER2 disagreement (Pre-AI): 119 | HER2 Score Distribution in Discordant Cases (Pre-AI) | ||||
| First 20 cases showing number of pathologists per score | ||||
| case_id | Score_0 | Score_1 | Score_2 | Score_3 |
|---|---|---|---|---|
| 10183-25 | 1 | 3 | 0 | 0 |
| 10353-25 | 1 | 2 | 0 | 0 |
| 10454-25 | 0 | 2 | 2 | 0 |
| 10676-25 | 0 | 1 | 3 | 0 |
| 10719-25 | 0 | 0 | 3 | 1 |
| 10928-25 | 0 | 3 | 1 | 0 |
| 11286-25 | 1 | 3 | 0 | 0 |
| 11352-25 | 1 | 2 | 0 | 0 |
| 11630-25 | 0 | 1 | 3 | 0 |
| 11632-25 | 1 | 3 | 0 | 0 |
| 12030-25 | 1 | 3 | 0 | 0 |
| 12068-25 | 0 | 1 | 3 | 0 |
| 12343-25 | 2 | 1 | 0 | 0 |
| 12366-25 | 0 | 2 | 1 | 0 |
| 12440-25 | 1 | 2 | 0 | 0 |
| 13471-25 | 2 | 1 | 0 | 0 |
| 13472-25 | 1 | 2 | 0 | 0 |
| 13582-25 | 1 | 3 | 0 | 0 |
| 14029-25 | 0 | 3 | 1 | 0 |
| 14058-25 | 0 | 2 | 2 | 0 |
| HER2 Disagreement Resolution | ||
| Outcome | Cases | Percentage (%) |
|---|---|---|
| AI created disagreement | 12 | 4.1 |
| AI resolved disagreement | 38 | 13.0 |
| Consistent throughout | 162 | 55.3 |
| Still discordant | 81 | 27.6 |
7.9 Pairwise Pathologist Disagreement
Create a disagreement matrix showing which pathologists disagree most.
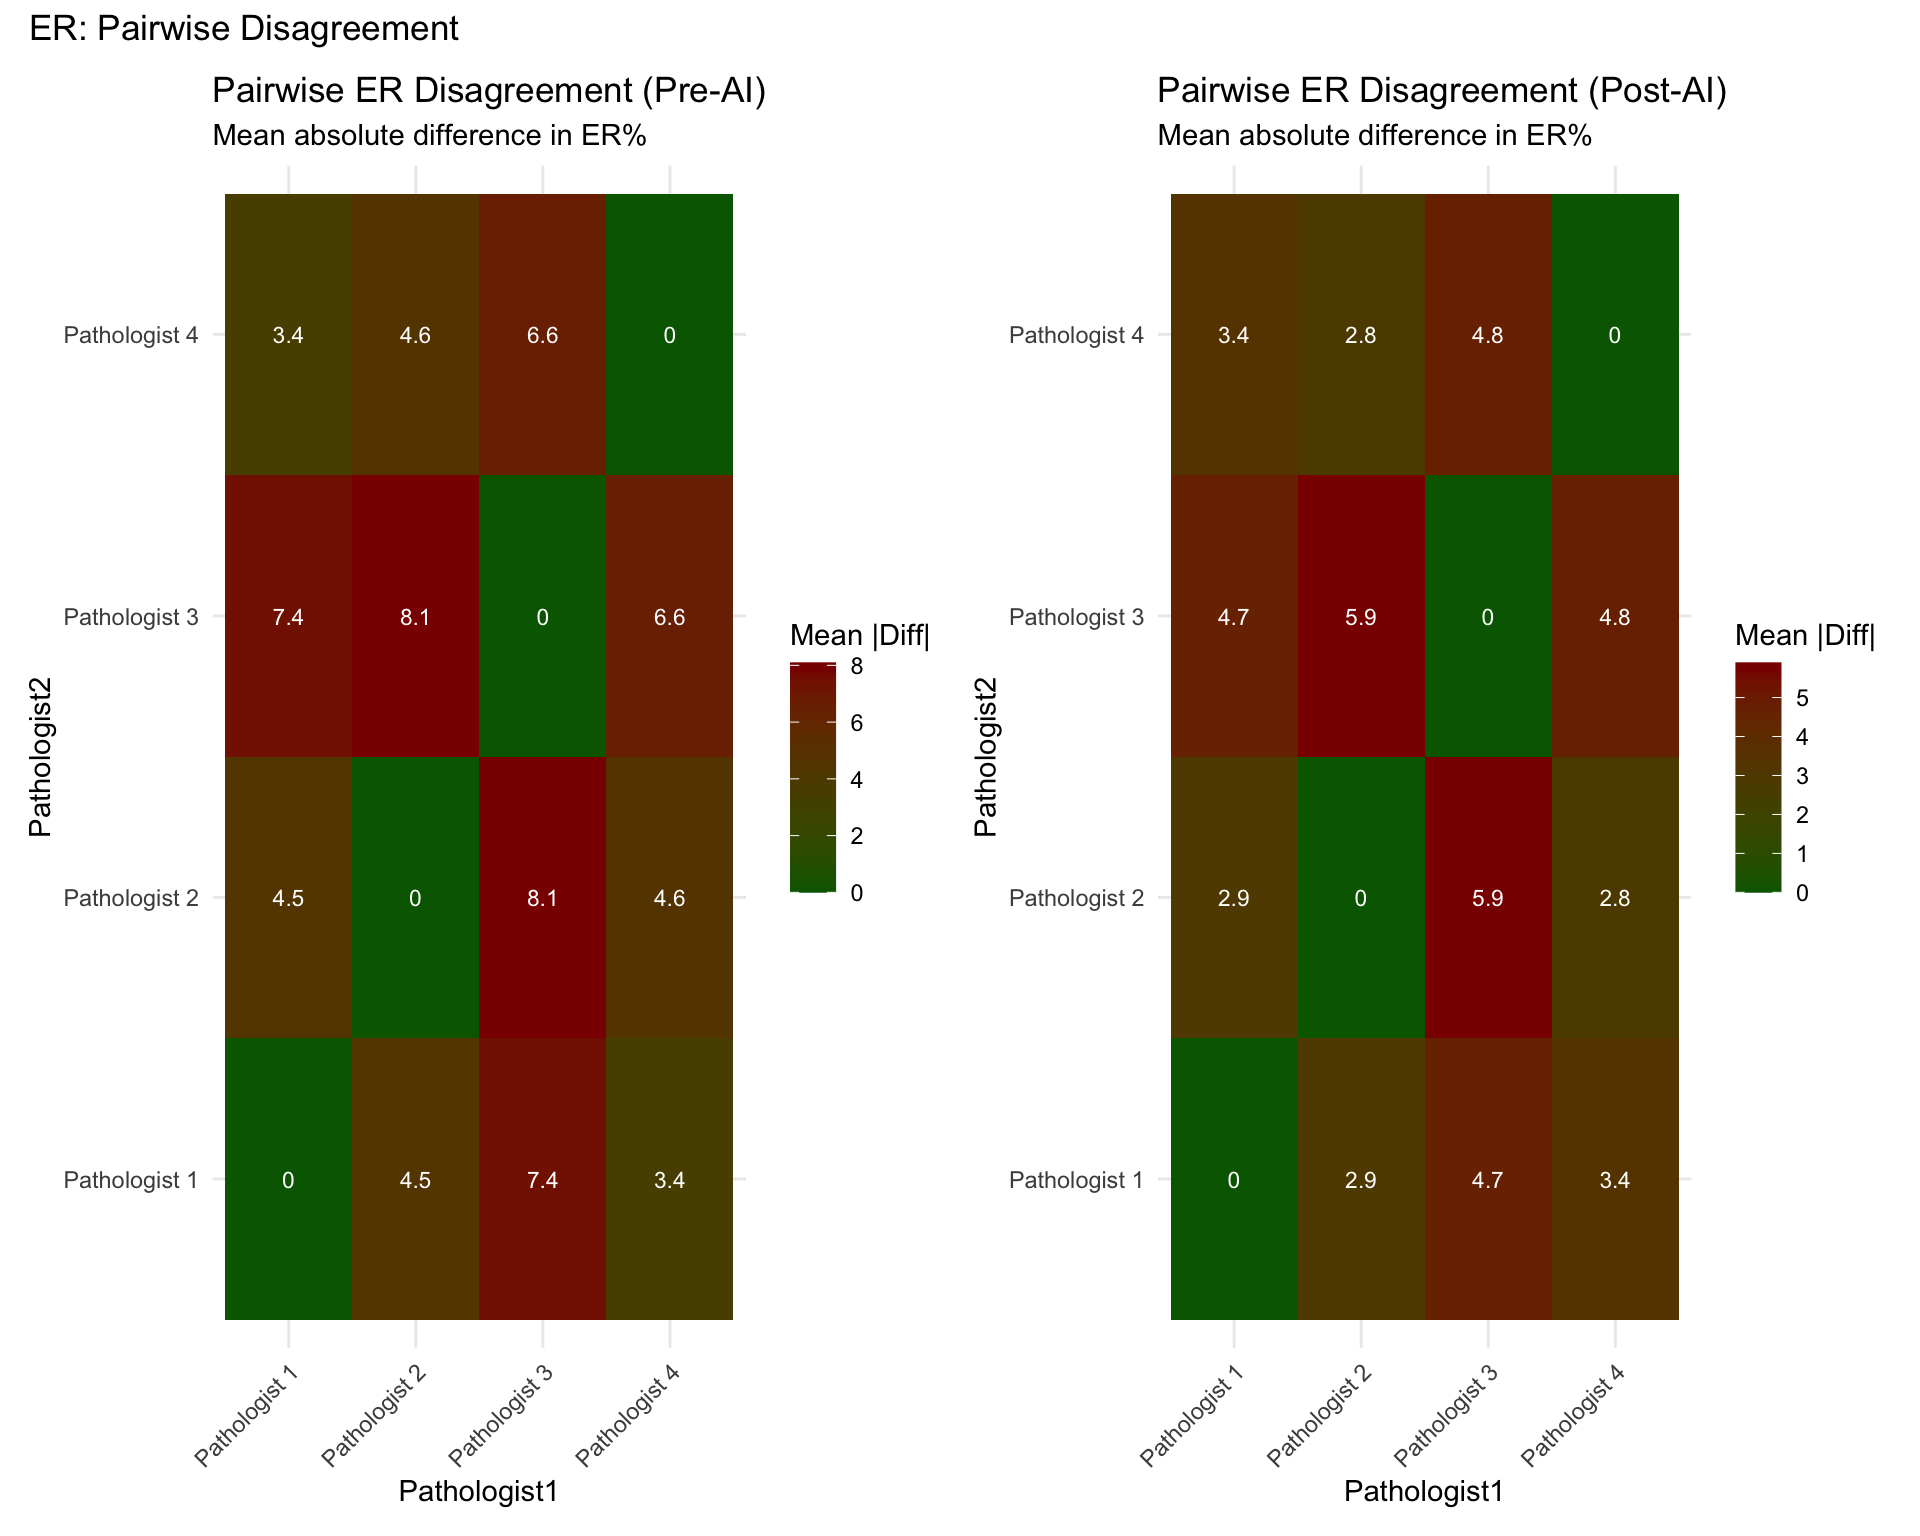


Note for Pathologist: These heatmaps show mean absolute differences between every pair of pathologists. Darker red cells mean larger disagreement. Compare the Pre-AI and Post-AI heatmaps for each marker: if cells become greener (lower values) after AI, it means AI helped those two pathologists converge.
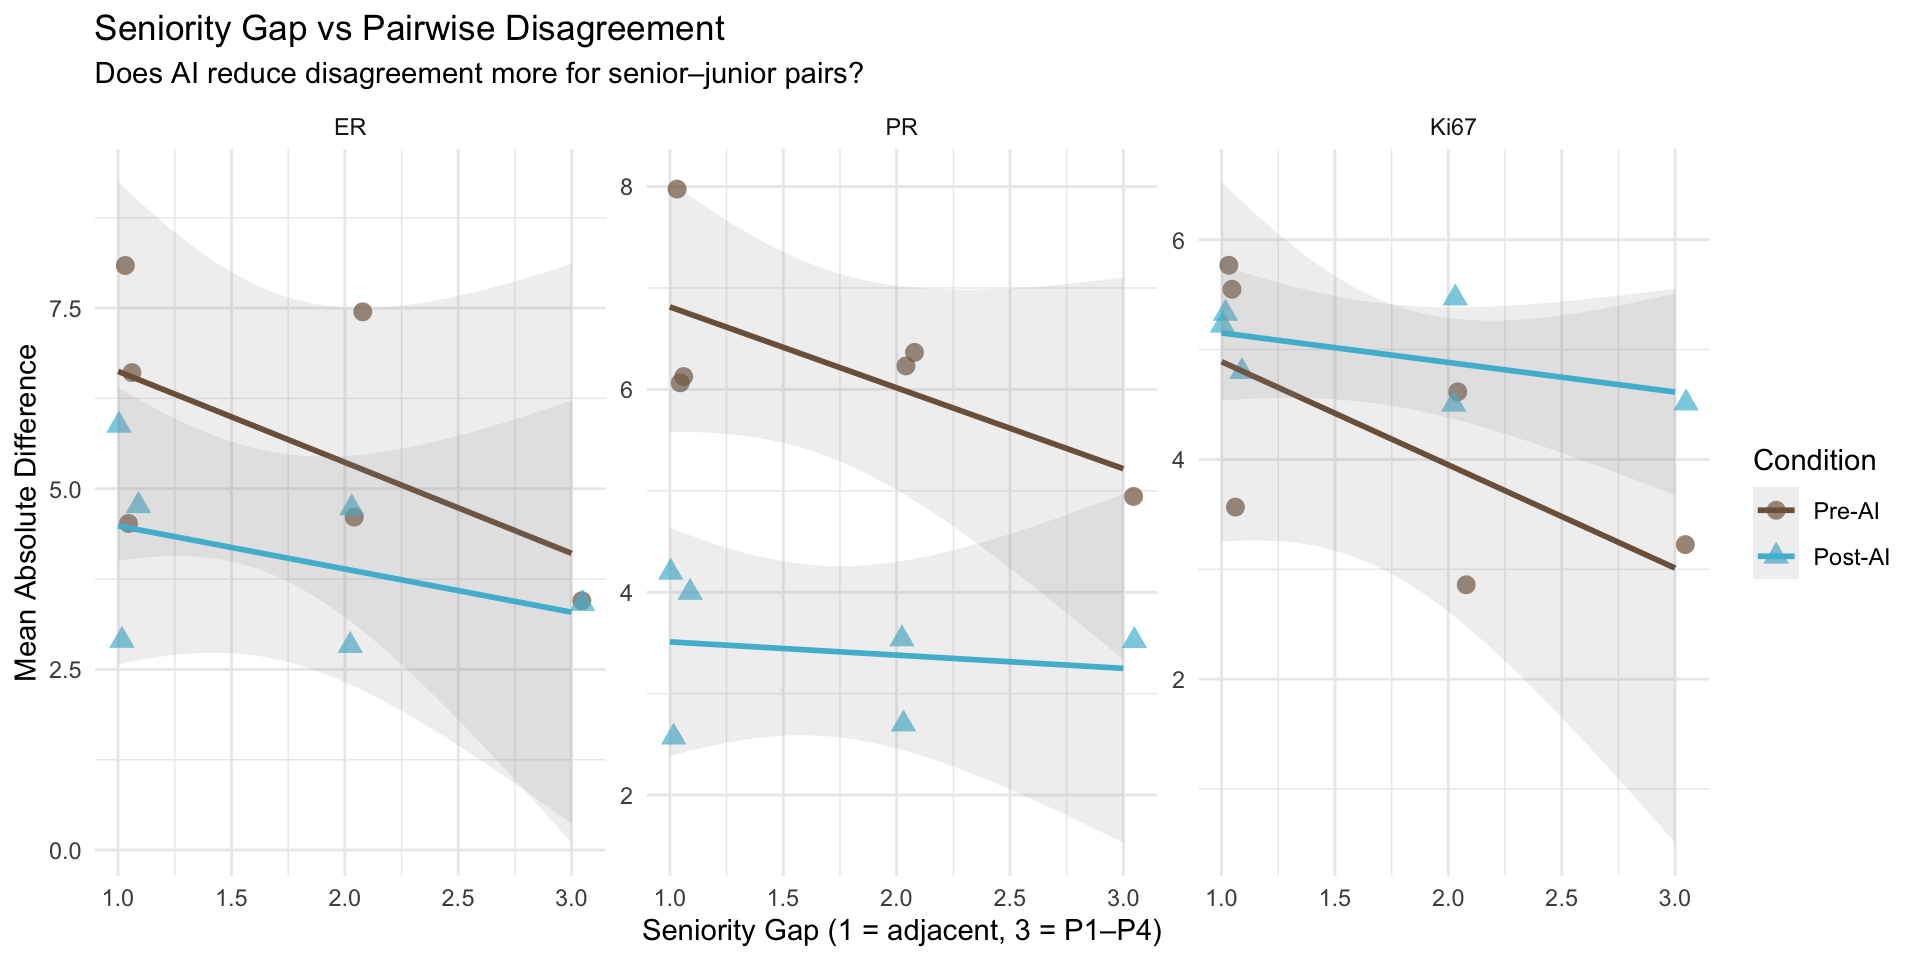
7.10 Seniority and Pairwise Disagreement
Does the seniority gap between pathologist pairs predict their disagreement? Wu et al. (2023) found that junior pathologists benefited most from AI, which may translate to larger pre-AI disagreements between senior-junior pairs and greater convergence post-AI (Wu et al. 2023).
Assumption: Pathologist 1 (most senior) → Pathologist 4 (most junior).
| Pairwise Disagreement by Seniority Gap | |||||
| Does experience difference predict disagreement magnitude? | |||||
| Seniority Gap1 | Pair Type | N Pairs | Mean |Δ| Pre-AI | Mean |Δ| Post-AI | Change2 |
|---|---|---|---|---|---|
| ER | |||||
| 1 | Adjacent | 3 | 6.41 | 4.52 | −1.88 |
| 2 | 2-level gap | 2 | 6.02 | 3.78 | −2.24 |
| 3 | Largest gap (P1–P4) | 1 | 3.45 | 3.40 | −0.05 |
| PR | |||||
| 1 | Adjacent | 3 | 6.72 | 3.60 | −3.13 |
| 2 | 2-level gap | 2 | 6.29 | 3.12 | −3.17 |
| 3 | Largest gap (P1–P4) | 1 | 4.94 | 3.51 | −1.44 |
| Ki67 | |||||
| 1 | Adjacent | 3 | 4.96 | 5.12 | 0.16 |
| 2 | 2-level gap | 2 | 3.74 | 4.99 | 1.25 |
| 3 | Largest gap (P1–P4) | 1 | 3.22 | 4.51 | 1.29 |
| 1 Seniority gap: 1 = adjacent levels (e.g., P1–P2), 3 = maximum gap (P1–P4) | |||||
| 2 Negative change (green) = AI reduced disagreement | |||||
7.10.1 Seniority Gap vs Disagreement
7.10.2 Per-Pair Detailed Analysis
| Pairwise Disagreement: Detailed Breakdown | ||||||
| Ordered by seniority gap (largest gap first) | ||||||
| Pair | Pre-AI |Δ| | Post-AI |Δ| | Change | % Change | Gap | Category |
|---|---|---|---|---|---|---|
| ER | ||||||
| P1–P4 | 3.45 | 3.40 | −0.05 | −1.5 | 3 | Largest gap |
| P2–P4 | 4.60 | 2.85 | −1.75 | −38.1 | 2 | 2-level gap |
| P1–P3 | 7.44 | 4.72 | −2.72 | −36.6 | 2 | 2-level gap |
| P1–P2 | 4.52 | 2.90 | −1.62 | −35.8 | 1 | Adjacent |
| P3–P4 | 6.60 | 4.77 | −1.84 | −27.8 | 1 | Adjacent |
| P2–P3 | 8.09 | 5.89 | −2.20 | −27.2 | 1 | Adjacent |
| PR | ||||||
| P1–P4 | 4.94 | 3.51 | −1.44 | −29.1 | 3 | Largest gap |
| P2–P4 | 6.22 | 3.56 | −2.67 | −42.8 | 2 | 2-level gap |
| P1–P3 | 6.36 | 2.68 | −3.67 | −57.8 | 2 | 2-level gap |
| P1–P2 | 6.07 | 2.57 | −3.49 | −57.6 | 1 | Adjacent |
| P3–P4 | 6.12 | 4.00 | −2.12 | −34.7 | 1 | Adjacent |
| P2–P3 | 7.98 | 4.22 | −3.76 | −47.2 | 1 | Adjacent |
| Ki67 | ||||||
| P1–P4 | 3.22 | 4.51 | 1.29 | 39.9 | 3 | Largest gap |
| P2–P4 | 4.61 | 4.50 | −0.11 | −2.4 | 2 | 2-level gap |
| P1–P3 | 2.86 | 5.47 | 2.61 | 91.3 | 2 | 2-level gap |
| P1–P2 | 5.55 | 5.33 | −0.22 | −4.0 | 1 | Adjacent |
| P3–P4 | 3.57 | 4.80 | 1.23 | 34.6 | 1 | Adjacent |
| P2–P3 | 5.77 | 5.22 | −0.54 | −9.4 | 1 | Adjacent |
7.10.3 Spearman Correlation: Seniority Gap and Disagreement
| Seniority Gap vs Disagreement: Spearman Correlations | ||||||
| ρ > 0: larger seniority gap → more disagreement | ||||||
| Marker |
Pre-AI Disagreement
|
Post-AI Disagreement
|
AI Effect on Disagreement
|
|||
|---|---|---|---|---|---|---|
| ρ (Pre-AI) | p (Pre-AI) | ρ (Post-AI) | p (Post-AI) | ρ (Change)1 | p (Change) | |
| ER | −0.463 | 0.355 | −0.432 | 0.392 | 0.309 | 0.552 |
| PR | −0.309 | 0.552 | −0.278 | 0.594 | 0.463 | 0.355 |
| Ki67 | −0.679 | 0.138 | −0.370 | 0.470 | 0.679 | 0.138 |
| 1 Negative ρ for Change indicates AI reduces disagreement more for senior–junior pairs | ||||||
7.11 Conclusion
7.11.1 Key Findings
High Variance Cases: These represent diagnostically challenging cases where even without AI, pathologists disagree substantially. These may require additional testing or expert consultation.
AI-Induced Disagreement: Cases where AI increased disagreement are concerning and warrant further investigation. These may represent:
- AI model errors or edge cases
- Cases where the AI suggestion is valid but contradicts established patterns
- Technical issues with slide preparation or scanning
AI-Resolved Disagreement: Cases where AI reduced variance demonstrate the value of AI as a standardization tool.
Marker-Specific Patterns: Some markers (typically Ki67) show higher baseline disagreement, which may or may not be improved by AI.
Pairwise Analysis: Understanding which pathologist pairs disagree most can inform training needs and quality assurance processes.
Seniority and Disagreement: The seniority gap analysis reveals whether experience differences contribute to pairwise disagreement and whether AI helps bridge the experience gap. Wu et al. (2023) found junior pathologists benefited most from AI (Wu et al. 2023), which may manifest as larger AI-driven convergence in senior–junior pairs.